
I’ve always been a practical person. And a sentimental person too. A lethal combination. Motherhood has amplified both of those traits significantly and they are frequently in opposition. I am constantly seeking creative ways to get utility out of things. And if one of those “things” is something my child has created, I can usually find a practical use! This is why I love kid-created holiday gift wrap, a sentimental craft that a loved one will feel so special to receive.
There are several ways to make your own wrapping paper, all of which are super simple and require materials you will have in your home (hello practicality!). The one required item among all of these methods is a roll of 18” easel paper. I will detail below the variety of super simple ways to transform an ordinary arts and crafts project into beautiful wrapping paper!
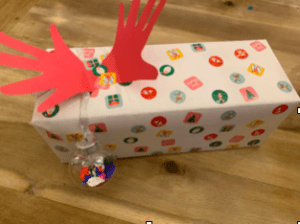
KID’S DIY GIFT WRAP – THE STICKER METHOD:
MATERIALS:
- Easel Paper
- Stickers (we use the 1,000 sticker roll from the dollar section of Target)
- Scissors
- Scotch Tape
- Construction Paper (optional)
DIRECTIONS:
- Wrap the gift in easel paper
- Have your child scatter stickers on all six sides of the box
- For added detail, trace your child’s handprints on a piece of construction paper. Cut them out and place them on top of the gift box, palms touching one another. Tape them down, and bend them so that they prop up to resemble the shape of a gift bow
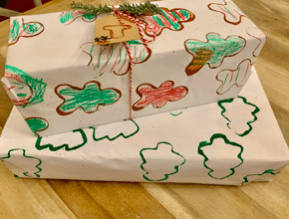
KID’S DIY GIFT WRAP – THE COOKIE CUTTER METHOD:
MATERIALS:
- Easel Paper
- Cookie Cutter
- Washable Paint
- Scissors
- Scotch Tape
- Crayons (optional)
DIRECTIONS:
- Roll the easel paper onto a surface your child can easily access. A table or floor work well.
- Place the washable paint onto a paper plate or another flat palette
- Have your child dip the cookie cutter into the paint and stamp the paper with it.
- Optional: once dried, have your child color in the shapes. Or you can leave them as blank space. Or do it both ways!
KID’S DIY GIFT WRAP – MENORAH HANDPRINTS:

MATERIALS:
- Easel Paper
- Yellow and Blue Washable Paint
- Yellow and Blue Dot Stickers
- Scissors
- Scotch Tape
DIRECTIONS:
- Wrap the gift in easel paper.
- Place your child’s hand, one at a time, into blue paint, evenly.
- Carefully guide their right hand onto the top surface of the wrapped gift.
- Do the same with their left hand. When placing their left hand, do it so that the left thumb overlaps with the right thumb that has been previously stamped.
- Use your child’s index finger to “light the flames.” Simply dip their index finger into yellow paint, and stamp it onto all 9 of the “candles.”
- For further decoration, have your child scatter yellow and blue dot stickers upon all 6 of the gift’s surfaces.
KID’S DIY GIFT WRAP – PUFFY PAINT SNOWMAN GIFT BAG METHOD
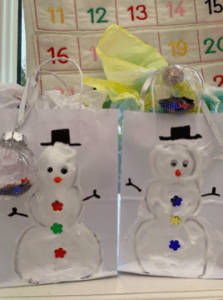
This method also works beautifully on a gift box wrapped in white easel paper. This is not exclusive to a gift bag.
MATERIALS:
- A white gift bag, of any size
- Shaving Cream
- Glue
- Black Marker
- Sequins/buttons/pom poms
- Googley Eyes
- Orange crayon
- Paintbrush
DIRECTIONS:
- Use your marker to draw the outline of a snowman onto the white gift bag.
- Mix equal parts of shaving cream and glue into a bowl to create the white puffy paint.
- Have your child apply the puffy paint onto the inside of the drawn snowman. Really encourage them to plop it on and not to flatten it as they go. It will flatten naturally as it dries, so the puffier the better!
- While the puffy paint is still wet, have your child add buttons using any materials you have on hand.
- Have your child add googley eyes onto the snowman’s face.
- Cut the tip of an orange marker and place it onto the snowman’s face, and have your child place it beneath the snowman’s eyes, to be his “carrot nose.”
- Use your marker to draw a hat on top of the snowman’s head and “stick” arms off of his body.
KID’S DIY GIFT WRAP: GIFT TAGS AND TISSUE PAPER – EXTRAS

Some extra ideas to make these gifts especially homemade.
Glittery Christmas Tree Sprigs: Adorn your gift wrap with glittery Christmas tree sprigs. Don’t worry, they won’t shed. Simply paint them with “Extreme Glitter Mod Podge.” Once dry, adhere them to the top of the gift box, with glue or tape.
Star of David Popsicle Stick Gift Tag: This is an especially adorable gift tag because it appears complex, but is actually so simple! Have your child glue 6 popsicles into two triangles, facing opposite directions on top of one another. Have them decorate each popsicle surface with mini pom poms, small buttons, sequins, crinkled up tissue paper, etc! Once dry, adhere it to the surface of the gift box with tape.
Ornament Gift Tag: Fill an empty glass/plastic ornament with your child’s photo, sequins, glitter, etc, and attach it to the gift box
Homemade Colored Tissue Paper: This is a fun one. Add your desired food dye color to a spray bottle filled with a little bit of water. *Tip: adding too much water will dilute the color, ie: you’ll wind up with pink paper instead of red. Lay 2-3 sheets of white tissue paper onto a table, and have your child spray the tissue paper until it is the desired color. If you do one sheet of paper at a time, this will not work. Allow the sheets of tissue paper to dry as a stack, in other words, do not separate each sheet from one another until they are fully dried. Once they are fully dried (about 30 minutes), separate them and stuff them into your puffy paint snowman gift bag, or any other gift bag you choose!
Thank you so much to Jenine of Smocks Paper Scissors for contributing this content!
